Posts

Showing posts with the label Microcontrollers/Embedded C

Hacking "ESP8266 Black Board T5" Part 2 - Blinky and Hello World on SDCC

Image
Previous Part: Hacking "ESP8266 Black Board T5" Part 1 - Blinky on Keil Lets now move to SDCC, because SDCC is free and the free version of Keil has limitations. We will also move away from Windows to Ubuntu 64 bit Installing SDCC on your Ubuntu PC Download 64 bit snapshot from: http://sdcc.sourceforge.net/snap.php#Linux The archive file would be named something like: sdcc-snapshot-amd64-unknown-linux2.5-20180712-10467.tar.bz2 Download it to your ~/Documents directory Then execute the following commands from the same directory (~/Documents) where you have placed the downloaded archive: tar xjf ../sdcc-snapshot-amd64-unknown-linux2.5-20180712-10467.tar.bz2  cd sdcc  sudo cp -r * /usr/local This will install sdcc binaries into: /usr/local/bin/ header files into: /usr/local/share/sdcc/include/ non-free header files into: /usr/local/share/sdcc/non-free/include/ library files into: /usr/local/share/sdcc/lib/ non-free library files into: /...
Hacking "ESP8266 Black Board T5" Part 1 - Blinky on Keil

Image
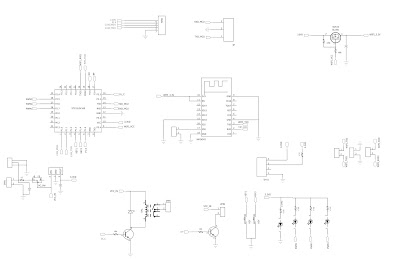
A few months ago, I got my hands on ESP8266 Black cloud features Board T5  which has an ESP8266, an 8051 microcontroller and a few sensors. The 8051 microcontroller acts as a master to the ESP8266 and comes loaded with a demo program which is supposed to work with some android app. ESP8266 can be directly programmed using Arduino, so it would be better if I would reprogram the 8051 to act as a slave connected to ESP8266. The ESP8266 will run an Arduino sketch (that I would write) and ask the 8051 for the sensor readings (over UART). To do that I would need to program the 8051 with come C program that I have written. So the first step was to learn how to compile a simple blinky program for the 8051 and be able to download and run it on it. Links: Black Board T5  User guide (in Chinese) explain how to use the android app ( Translated version ) Reworking the AI Thinker "Black board T5 Schematic of Black Board T5  (You will need Batang font to view it) Source code...

Build system comparison for C shared library: Manual vs. Makefile vs. Bazel

Image
Here is a simple code for shared library (.so) and an executable that uses it: Library Source files (libhello.c and libhello.h): Source for the executable that uses the above library (main.c): There are many ways to build and execute these sources. Lets look at three of them. The first one is a collection of manual commands that you need to execute in a particular order. The other two uses some form of build system. Before you proceed, make sure to have the C compiler installed on your Ubuntu PC. To do this, execute the following at the command prompt: sudo apt-get install build-essential git Manual build: (Reference: http://www.cprogramming.com/tutorial/shared-libraries-linux-gcc.html ) Place the three source files in the same directory. Open the command prompt, switch to the same directory and execute the following commands to compile, execute and clean: Compilation Compiling the library sources into object files with Position Independent Code: gcc -c -Wal...

Come C tricks

Swapping the values of two variables with out using a third!! x = x ^ y; y = x ^ y; x = x ^ y; All hail the XOR operation Reference: https://www.cs.umd.edu/class/sum2003/cmsc311/Notes/BitOp/xor.html int c; c &= (c-1); check if c == 0 This allows you to check if C is a power of 2 (i.e. 0,1,2,4,8...) Reading sentences (including spaces) from stdin: scanf("%s",str); can't read spaces in input string. To do that, you have to: scanf(" %[^\n]s",str); Note the space before % within the quotes. Reference:  https://gpraveenkumar.wordpress.com/2009/06/10/how-to-use-scanf-to-read-string-with-space/

Classroom Timer V1

Image
If you have ever been a teacher at any point in your life, you would have realized the importance of keeping your students engaged and on task at all times during the short period every day that you get to spend time teaching them. If you have just 30 minutes per day, you want to maximize the learning by having a structured lesson plan that moves smoothly from Introduction to New Material to Guided Practice and into Independent Practice. And if you have planned for the lecture properly, you would know how much time you want to spend at each stage doing each activity with the kids to ensure that the lesson is completed on time and doesn't spill over onto the next lecture. You may have a clock in your class, but having a countdown timer makes more sense in competitive and group activities. When the kids see the time ticking down, and they rush to try to finish the activity on time, it can give them an adrenalin rush and bring excitement to the activity. I am an engineer by prof...

Arduino code for ESP8266 to take readings from DHT11 and upload them to InitialState.com

Image
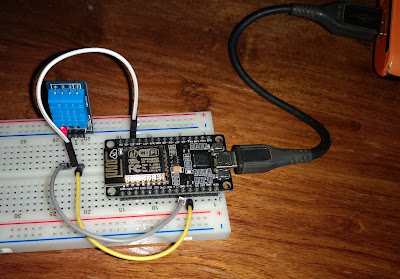
www.initialstate.com is a great data broker and visualization platform for IoT devices. Up until now it was out of reach for ESP8266 fans because the Arduino environment for ESP8266 did not support SSL/TLS connections. But now it does. So here is how to get HTTPS working on ESP8266 using Arduino IDE and upload readings from DHT11 every 10 seconds. ESP8266 and DHT11  Steps for Windows computers: Install  CP2102 drivers for the USB-UART chip onboard the ESP8266 NodeMcu v1.0 board Get the latest offline Arduino IDE Windows Installer from  https://www.arduino.cc/en/Main/Software Install Board support for ESP8266 in your Arduino IDE, follow instructions here: https://learn.sparkfun.com/tutorials/esp8266-thing-hookup-guide/installing-the-esp8266-arduino-addon Assemble your ESP8266 and DHT11 circuit. You will need 3 jumper cables and a breadboard to connect 3 signals from ESP8266 to DHT11 module. Connect pin marked D2 on ESP8266 to DHT11's data pin. Also supply 3.3...

ESP8266 + DHT22 + Arduino + Web Server

Image
So here is a modified version of how to get a DHT22 working on ESP8266 NodeMcu board using the Arduino IDE (not Lua) The project is based on: http://randomnerdtutorials.com/esp8266-dht11dht22-temperature-and-humidity-web-server-with-arduino-ide/ Get the components and assemble them. In India you can find these on VishaWorld.com NodeMcu ESP8266 | Link DHT22 |  Male-Male Jumper Wires |  Bread Board | Link MicroUSB cable |  Assemble the circuit as shown. Connect the Data pin of SHT22 to D2 of NodeMcu (which is referred to pin 4 in Arduino IDE) Install the driver for USB-Serial chip on your PC: http://www.silabs.com/products/mcu/pages/usbtouartbridgevcpdrivers.aspx Install Arduino on your computer and install support for ESP8266 Board, refer: https://learn.sparkfun.com/tutorials/esp8266-thing-hookup-guide/installing-the-esp8266-arduino-addon Install the DHT-sensor-library-master library as outlined here: http://randomnerdtutorials.com/esp8266-dht11dh...

Interface USB Mouse to your Arduino using CH375B

Image
CH375B module. It is usually supplied with a 2 way jumper mounted on TXD and RXD pin. The TXD RXD pins are located next to the female USB receptacle. Please unmount the jumper before use. Get the following components: Arduino Nano  Male to female jumper wires  - 4 pieces USB Mouse CH375B module Download MeUsb.cpp and MeUsb.h from  https://github.com/xeecos/Me-USB-Host On your Windows computer which already has arduino installed, go to your documents folder. There you will find a folder called arduino and within that another folder called libraries. Inside this libraries folder create a new folder called "MeUsb" Place MeUsb.cpp and MeUsb.h in this folder In the arduino\libraries folder, create another folder called "SoftwareSerial_fix" And in this folder download and place SoftwareSerial_fix.cpp and SoftwareSerial_fix.h from the same link as above. Assemble the circuit on the bread board as follows: +5V of Arduino Nano to ...

Personal Analytics using DIY IoT devices and InitialState.com

Image
Recently I have blogged about three DIY IoT devices that I have put up in my house. Some of these devices have been running for past 3 years and uploading data points to one of the three data brokers - Xively or ThingSpeak or Carriots. A few months ago I switch to InitialState.com which has a sleek interface and allows you to analyse your data in a much better visually intuitive way. So with the following 3 devices collecting data using sensors from inside my house... Weather station outside - installed in my balcony (temperature, humidity, pressure, light) Ambient sensors inside the house next too the bathroom (temperature and humidity) Electrical Energy Meter - Monitoring voltages, currents etc on all 3 phases  ...here are the few insights that I gleaned on from analyzing the data: Overview: This is what my tiles app looks like with the various data stream being fed from the 3 IoT devices Recently, InitialState.com made changes to their platform to all...

SHT11 + Particle Photon (running matrixSSL) + InitialState.com

Image
Now days microcontroller platform for IoT devices are becoming more and more powerful so much so that they can now sport an HTTPS stack and hence send telemetry to an HTTPS capable data broker like initialstate.com. Which means no need for any linux based gateway/hub - you can do away with your Raspberry Pi as a go between your microcontroller node and the internet. You ask why would some one want to do that? Simple - lesser the number of components in your system, lesser the points of failure. So, I wanted to explore if it was possible to use a Particle Photon to send data directly to initialstate.com  and recently it just became possible when a few good folks ported an SSL library to Spark Photon. My Particle Photon with SHT11 Steps: Get a Particle Photon and connect it to SHT11. SHT11 is a digital temperature and humidity sensor. It works at 3.3V logic levels and can be powered by the photon itself. The photon will draw power from any nearby device (computer, ...