What?
Raspberry Pi running Motion Pie. USB Webcam is connected to it. A bash script pushes small snippets of videos (shot when motion is detected() to your phone.
How?
- Signup for PushBullet and install the android app on your phone (and chrome extension on your browser)
- Take a Raspberry Pi and connect a Raspberry Pi Camera or USB Webcam to it. I used a UVC USB Webcam.
- Format a SD Card on your computer and write the Motion Pie image to it. Here is how to do it.
- Connect your Raspberry Pi to your home WiFi router using Ethernet cable. My house has CAT5 wire running through pipes concealed in the walls.
- Perform basic configuration on the Raspberry Pi using its web interface.
- Administrator password. (Otherwise you wont be able to connect to it using SSH/PuTTY)
- Setting the timezone.
- Network setting - I used static IP address.
- Enable FTP write support.
- Video Device - Camera name or rotation etc.
- File storage: I used "network share" option to point back to the RPi's SD card folder shared over the network. Not sure why the default option of saving files to SD card did not work for me.
- Motion detection threshold - I set mine to 10% because I also have a motion activated light switch installed outside my door.
- Working Schedule - Make sure to cover all days and times of the week
- Use PuTTY to install a bash script (pushbullet.sh) on it.
- Make sure to set your PushBullet access token in the script.
- Before you can use nano to create a script file , you will need to remount the filesystem to make it writable. to do that issue the command: mount -o remount,rw /
Read FAQ here.
- Mark the script as executable: chmod +x pushbullet.sh
- Configure the Raspberry Pi using its web interface to run the pushbullet.sh script when Motion is detected. This option is available under "Motion Notification"
- Put everything in an enclosure and install it near your door. In my case I used a lunch box to hold the RPi and its power supply (standard 5V USB smart phone charger). I installed the cam near the door and ran its USB came through my concealed wiring pipes embedded in the walls of my apartment.
- Wait for motion.
Pushbullet.sh
 1
 2
 3
 4
 5
 6
 7
 8
 9
10
11
12
13
14
15
16
17
18
19
20
21
22
23
24
25
26
27
28
29
30
31
32
33
34
35
36
37
38
39
40
41
42
43
44
45
46
47
48
49
50
51
52
53
54
55
56
57
58
59
60
61
62
63
64
65
66
67
68
69
70
71
72
73
74
75
76
77
78
| #!/bin/bash
## Your PushBullet Access Token
## Fetch yours from your "Account Settings" Page: https://www.pushbullet.com/#settings/account
## PushBullet API Documentation link: https://docs.pushbullet.com/#api-quick-start
ACCESSTOKEN="CHANGE_TO_YOUR_ACCESS_TOKEN"
## Following bash script function taken from https://gist.github.com/cjus/1047794
## It extracts value for a corresponding key from a JSON response.
function jsonval {
temp=`echo $json | sed 's/\\\\\//\//g' | sed 's/[{}]//g' | awk -v k="text" '{n=split($0,a,","); for (i=1; i<=n; i++) print a[i]}' | sed 's/\"\:\"/\|/g' | sed 's/[\,]/ /g' | sed 's/\"//g' | grep -w $json_key`
echo ${temp##*|}
}
## Get the current date and time
DATESTAMP=$(date +"%Y-%m-%d")
TIMESTAMP=$(date +"%H-%M-%S")
## Get the name of the latest AVI clip shot and placed with a folder on your Raspberry Pi's SD card
LATESTAVI=$(ls -tr1 /home/ftp/sdcard/$DATESTAMP/*.avi | tail -1 | sed 's#.*/##')
## The latest AVI might still be open and being written to.
## So if we try to upload the file rightaway, the file size will be reported to be greater than 25 MB
## and PushBullet will reject it. So we will wait for 30 seconds to allow the system to finish writing the file.
## Ideally we should use lsof utility to wait until the file is done writing, but lsof command is not available on Motion Pie.
sleep 30
## Pushing a file is a 3 step process
## Step 1: Send a request for file upload.
## PushBullet will respond with a URL to which you can upload your file. (upload URL)
## PushBullet will also respond with a URL at which the file will be available after upload. (File URL)
## No push message is sent in this step.
## File is not uploaded in this step.
## Documentation: https://docs.pushbullet.com/#upload-request
##
## Step 2: Upload the file to the URL which was assigned to you in Step 1
## Documentation: https://docs.pushbullet.com/#upload
##
## Step 3: A push need to be sent for that file. This push can include a message as well as the File URL generated in Step 1.
## Documentation: https://docs.pushbullet.com/#push-a-file
## https://docs.pushbullet.com/#create-push
## Step 1: Request file upload
json="$(curl \
--header 'Access-Token: '$ACCESSTOKEN \
--header 'Content-Type: application/json' \
--data-binary '{"file_name":"'"$LATESTAVI"'","file_type":"video/avi"}' \
--request POST \
https://api.pushbullet.com/v2/upload-request)"
## Extract the JSON fields: espesially the Upload URL and File URL
json_key='upload_url'
UPLOAD_URL=`jsonval`
json_key='file_url'
FILE_URL=`jsonval`
json_key='file_name'
FILE_NAME=`jsonval`
json_key='file_type'
FILE_TYPE=`jsonval`
## Step 2: Upload the file
echo "About to upload $LATESTAVI to $UPLOAD_URL"
curl -i -X POST $UPLOAD_URL -F file=@/home/ftp/sdcard/$DATESTAMP/$LATESTAVI
echo "Done uploading. File now available at $FILE_URL"
## Step 3: Send a push message including a link to the file.
## If the Push is received on a smart phone, the file will be automatically downloaded to it.
echo "Now pushing the file $LATESTAVI to Devices."
curl \
--header 'Access-Token: '$ACCESSTOKEN \
--header 'Content-Type: application/json' \
--data-binary '{"type":"file","body":"Motion detected at '"$DATESTAMP $TIMESTAMP"'","file_name":"'"$FILE_NAME"'","file_type":"'"$FILE_TYPE"'","file_url":"'"$FILE_URL"'"}' \
--request POST \
https://api.pushbullet.com/v2/pushes
|
My web configuration settings:
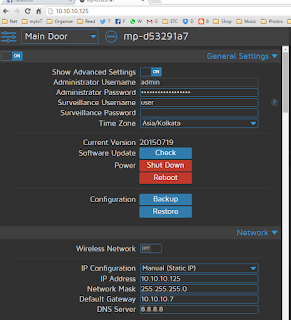 |
Make sure to set admin password. Set the timezone too.
Network settings may be needed if you don't want to use DHCP - it is always
better to ensure static IP address if you want to access
the live video feed using VLC app on your phone or a
computer from inside your own home network. |
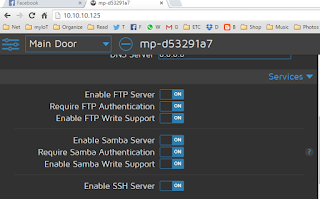 |
| Enable FTP and Samba write support |
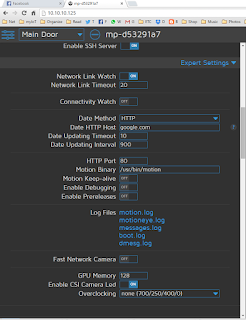 |
| Nothing much to change here. |
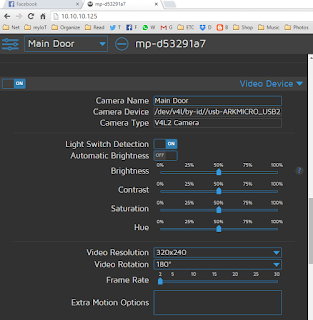 |
Name the camera. Since I had mounted my camera upside down,
I had to set the rotation to 180 degrees. |
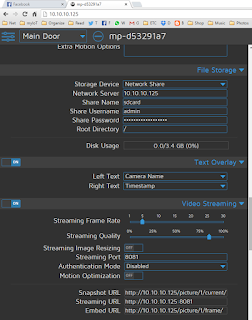 |
Set the storage to Network Share and point it to the IP address of RPi itself.
Enter the appropriate credentials as well. |
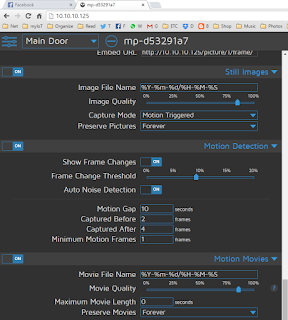 |
I set the motion detection threshold to 10% and
turned the frame changes ON (Pink square around the changing parts
of frame where motion is detected) |
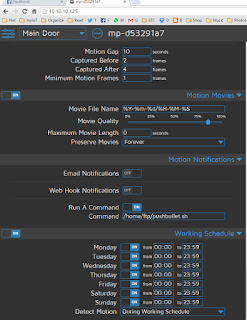 |
Working schedule set to cover all days and times.
The location of pushbullet.sh is mentioned here under Motion Notifications - make sure to perform that setting only after writing the script to the SD card using PuTTY. |


This comment has been removed by the author.
ReplyDeleteInteresting script
ReplyDeleteAfter the file uploaded, it seems
the script say:
Now pushing the file 20-44-24.mp4 to Devices.
{"error":{"code":"invalid_param","type":"invalid_request","message":"The param 'file_url' has an invalid value.","param":"file_url","cat":"\u003e:3"},"error_code":"invalid_param"}
can you help me? please